 React生命周期详解
# 前言
目前React的类组件依旧是我日常开发构建组件的主要方式,尽管React-Hooks一直被认为是未来React发展趋势,了解Class组件内置的生命周期函数对后续过渡到Hooks时代也是有帮助的。
本篇博客需要记录的问题有:
- react 各个生命周期函数的用法。
- 新增的React16.4新增的函数以及用法。
# 生命周期函数的分类与作用
生命周期函数大致可以分为3类阶段:
- 挂载阶段
- 更新阶段
- 卸载阶段
下面开始分阶段介绍:
# 1.挂载阶段
当组件实例被创建并插入 DOM 中时,其生命周期调用顺序如下:
constructor()构造器这个阶段
constructor函数只解决两件事:- 通过
this.state赋值对象来初始化内部state。 - 为事件处理函数绑定实例(ps:虽然这个要多写点代码,但是貌似性能不错)
- 通过
static getDerivedStateFromProps()- 在初始化挂载及后续更新时都会被调用。
- 返回一个对象来更新
state - 应用:
- 父组件渲染会导致子组件渲染,可以在此生命周期函数对数据进行拦截
render()- class 组件中唯一必须实现的方法
- 支持返回的参数:
JSX语法nullorfalse
componentDidMount()- 会在组件实例挂载后(插入 DOM 树中)立即调用
- 应用:
- 可以在此生命周期发起网络请求。
# constructor
constructor(props) {
  super(props);
  // 不要在这里调用 this.setState()
  this.state = { counter: 0 };
  this.handleClick = this.handleClick.bind(this);
}

// 下面这中写法貌似也是可以的
// state 直接作为类组件的一个属性。
class App extends React.Component{
  state = { counter: 0}
}
2
3
4
5
6
7
8
9
10
11
12
如果没有写
constructor函数,会有一个默认的构造函数,所以可以不显式定义如果要在
constructor函数中使用this指针,一定需要super(props)
# static getDerivedStateFromProps
static getDerivedStateFromProps(nextProps, prevState,snapshot) {
  // 根据nextProps和prevState计算出预期的状态改变,返回结果会被送给setState
  // 注:这里无法使用 this 指针
}
2
3
4
该函数是一个纯函数:纯函数的意思就是说输出完全决定于输入。
(nextProps,prevState)newState此函数用于替换掉大部分的
render前的生命周期函数,包括:componentWillReceivePropscomponentWillMount注:在此生命周期中发起
AJAX请求是无法赶在首次render之前拿到数据结果的。componentWillUpdate
替换原因:
Reactv17会采用Fiber,render函数之前的所有函数都有可能被执行多次。
# componentDidMount
可以在此阶段,使用AJAX请求数据
componentDidMount(){
    axios.post('https://web-api.juejin.im/v3/web/wbbr/bgeda')
        .then((res)=>{console.log('axios 获取数据成功:'+JSON.stringify(res))  })
        .catch((error)=>{console.log('axios 获取数据失败'+error)})
}
2
3
4
5
# 2.更新阶段
当组件实例被创建并插入 DOM 后时,其生命周期调用顺序如下:
static getDerivedStateFromProps()- 在初始化挂载及后续更新时都会被调用。
- 返回一个对象来更新
state - 应用:
- 父组件渲染会导致子组件渲染,可以在此生命周期函数对数据进行拦截
shouldComponentUpdate- 在此生命周期,可以优化渲染性能。
- 默认
return true,可以return false停止渲染
render()- class 组件中唯一必须实现的方法
- 支持返回的参数:
JSX语法nullorfalse
getSnapshotBeforUpdate()- 没啥用,可以处理视图层相关的操作。
componentDidUpdate()- 可以解决
setState(,callbakc)
- 可以解决
# static getDerivedStateFromProps
由于React更新后,render前的方案都需要被反复调用,所以无论在挂载阶段,还是在更新阶段,此函数都会执行。
使用方法见:点击跳转
# 🚨componentWillReceiveProps
非常常用的一个控制状态更新的生命周期函数,在旧版React这样的生命周期函数只有两个:
shouldComponentUpdate:只能return true或者falsecomponentWillReceiveProps:通过比较两个
props:nextProps(新)和this.props(旧,因为还没有render),可以直接对state状态进行更新,并且注意的是由于是在render函数之前,所以这种更新是同步的。state = { a: 0 } componentWillReceiveProps(nextProps){ this.setState({a:1}) console.log(this.state.a) // 0 } render(){ console.log(this.state.a) // 1 }1
2
3
4
5
6
7
8
9
10
11注:这样一来会破坏掉
state数据的==单一数据源==的特性,导致组件状态变得不可测。
# shouldComponentUpdate
在React中,当prop或者state发生变化时,可以通过在shouldComponentUpdate生命周期函数中执行return false来阻止页面的更新,从而减少不必要的render执行。
shouldComponentUpdate(nextProps,nextState){
// 判断:this.props与nextProps | this.state与nextState
// 注:不要使用JSON.stringfy()进行深比较,非常影响效率、损耗性能。
  if(  条件判断  ){
    return false
  }
  return true
}
2
3
4
5
6
7
8
技巧:如果使用pureComponent会自动对状态进行判断
class App extends React.pureComponent{

}
2
3
# render
没啥好说的,
# getSnapshotBeforeUpdate
见componentDidUpdate():点击跳转
# componentDidUpdate
可以用于替换setState(,callback)函数,setState对状态修改后,会进入到componentDidUpdate这个生命周期函数。
state = {
  a: 0,
  b: 0
}
// 会刷新3次
this.setState({a:1},()=>{
  this.setState({b:1},()=>{
    this.setState({c:1})
  })
})

// 使用componentDidUpdate替换写法
// !如果在此生命周期中,使用this.setState()会引发循环渲染
// 所以必须有条件判断
componentDidUpdate(nextProps,nextState){
  if(nextState.a ===1){
    this.setState({b:1})
  }
  if(nexState.a ===1 && nextState.b===1){
    this.setState({c:1})
  }
}
// 可以发现这种写法很low,这个时候需要重新思考数据的设计模式。
2
3
4
5
6
7
8
9
10
11
12
13
14
15
16
17
18
19
20
21
22
23
点击查看
除此以外,getDerivedStateFromProps还可以与getSnapshotBeforeUpdate配合使用,后者的值可以作为getDerivedStateFromProps的第三个参数输入:
  getSnapshotBeforeUpdate(prevProps, prevState) {
    // snapshot咋看是组件级别的某个“快照”,其实返回任何值
    // 官方推荐:在此阶段可以获取DOM元素,但是具体的有效实例没有发现
    // 程墨更是直接不推荐使用
    return 'foo';
  }

  componentDidUpdate(prevProps, prevState, snapshot) {
    console.log('#enter componentDidUpdate snapshot = ', snapshot);
  }
2
3
4
5
6
7
8
9
10
# 3.卸载阶段
卸载阶段只有一个生命周期函数,componentWillUnmount()会在组件卸载及销毁之前直接调用。
# componentWillUnmount
在此方法中执行必要的清理操作:
- 清除 timer,取消网络请求或清除
- 取消在 componentDidMount() 中创建的订阅等
注:不应该再这个方法中使用
setState,因为组件一旦被卸载,就不会再装载,也就不会重新渲染。
# 不常用的知识点
# 1.state|props初始化
state的初始化函数:constructorprops的初始化函数:defaultProps
这个牵扯到一个知识点,React声明类组件实际上有两种方式:
ES5原生方式
React.createClass定义的组件。var ShowTitle = React.createClass({ getDefaultProps:function(){ return{ title : "React" } }, getInitialState:function(){ return { title : "React" } } render : function(){ return <h1>{this.props.title}</h1> } });1
2
3
4
5
6
7
8
9
10
11
12
13
14
15🚨 目前这种写法已经不推荐了。
ES6形式,通过继承
React.component的方式定义的组件,也是目前React官方最为推荐的写法。class App extends React.Component { // defaultProps 作为静态属性 static defaultProps = { title: "react" } constructor(props){ super(props) this.state = {} } } // 别的教程中,对defaultProps配合 prop-types 使用 App.defaultProps = { defaultValue : "Hello" }1
2
3
4
5
6
7
8
9
10
11
12
13
14
15
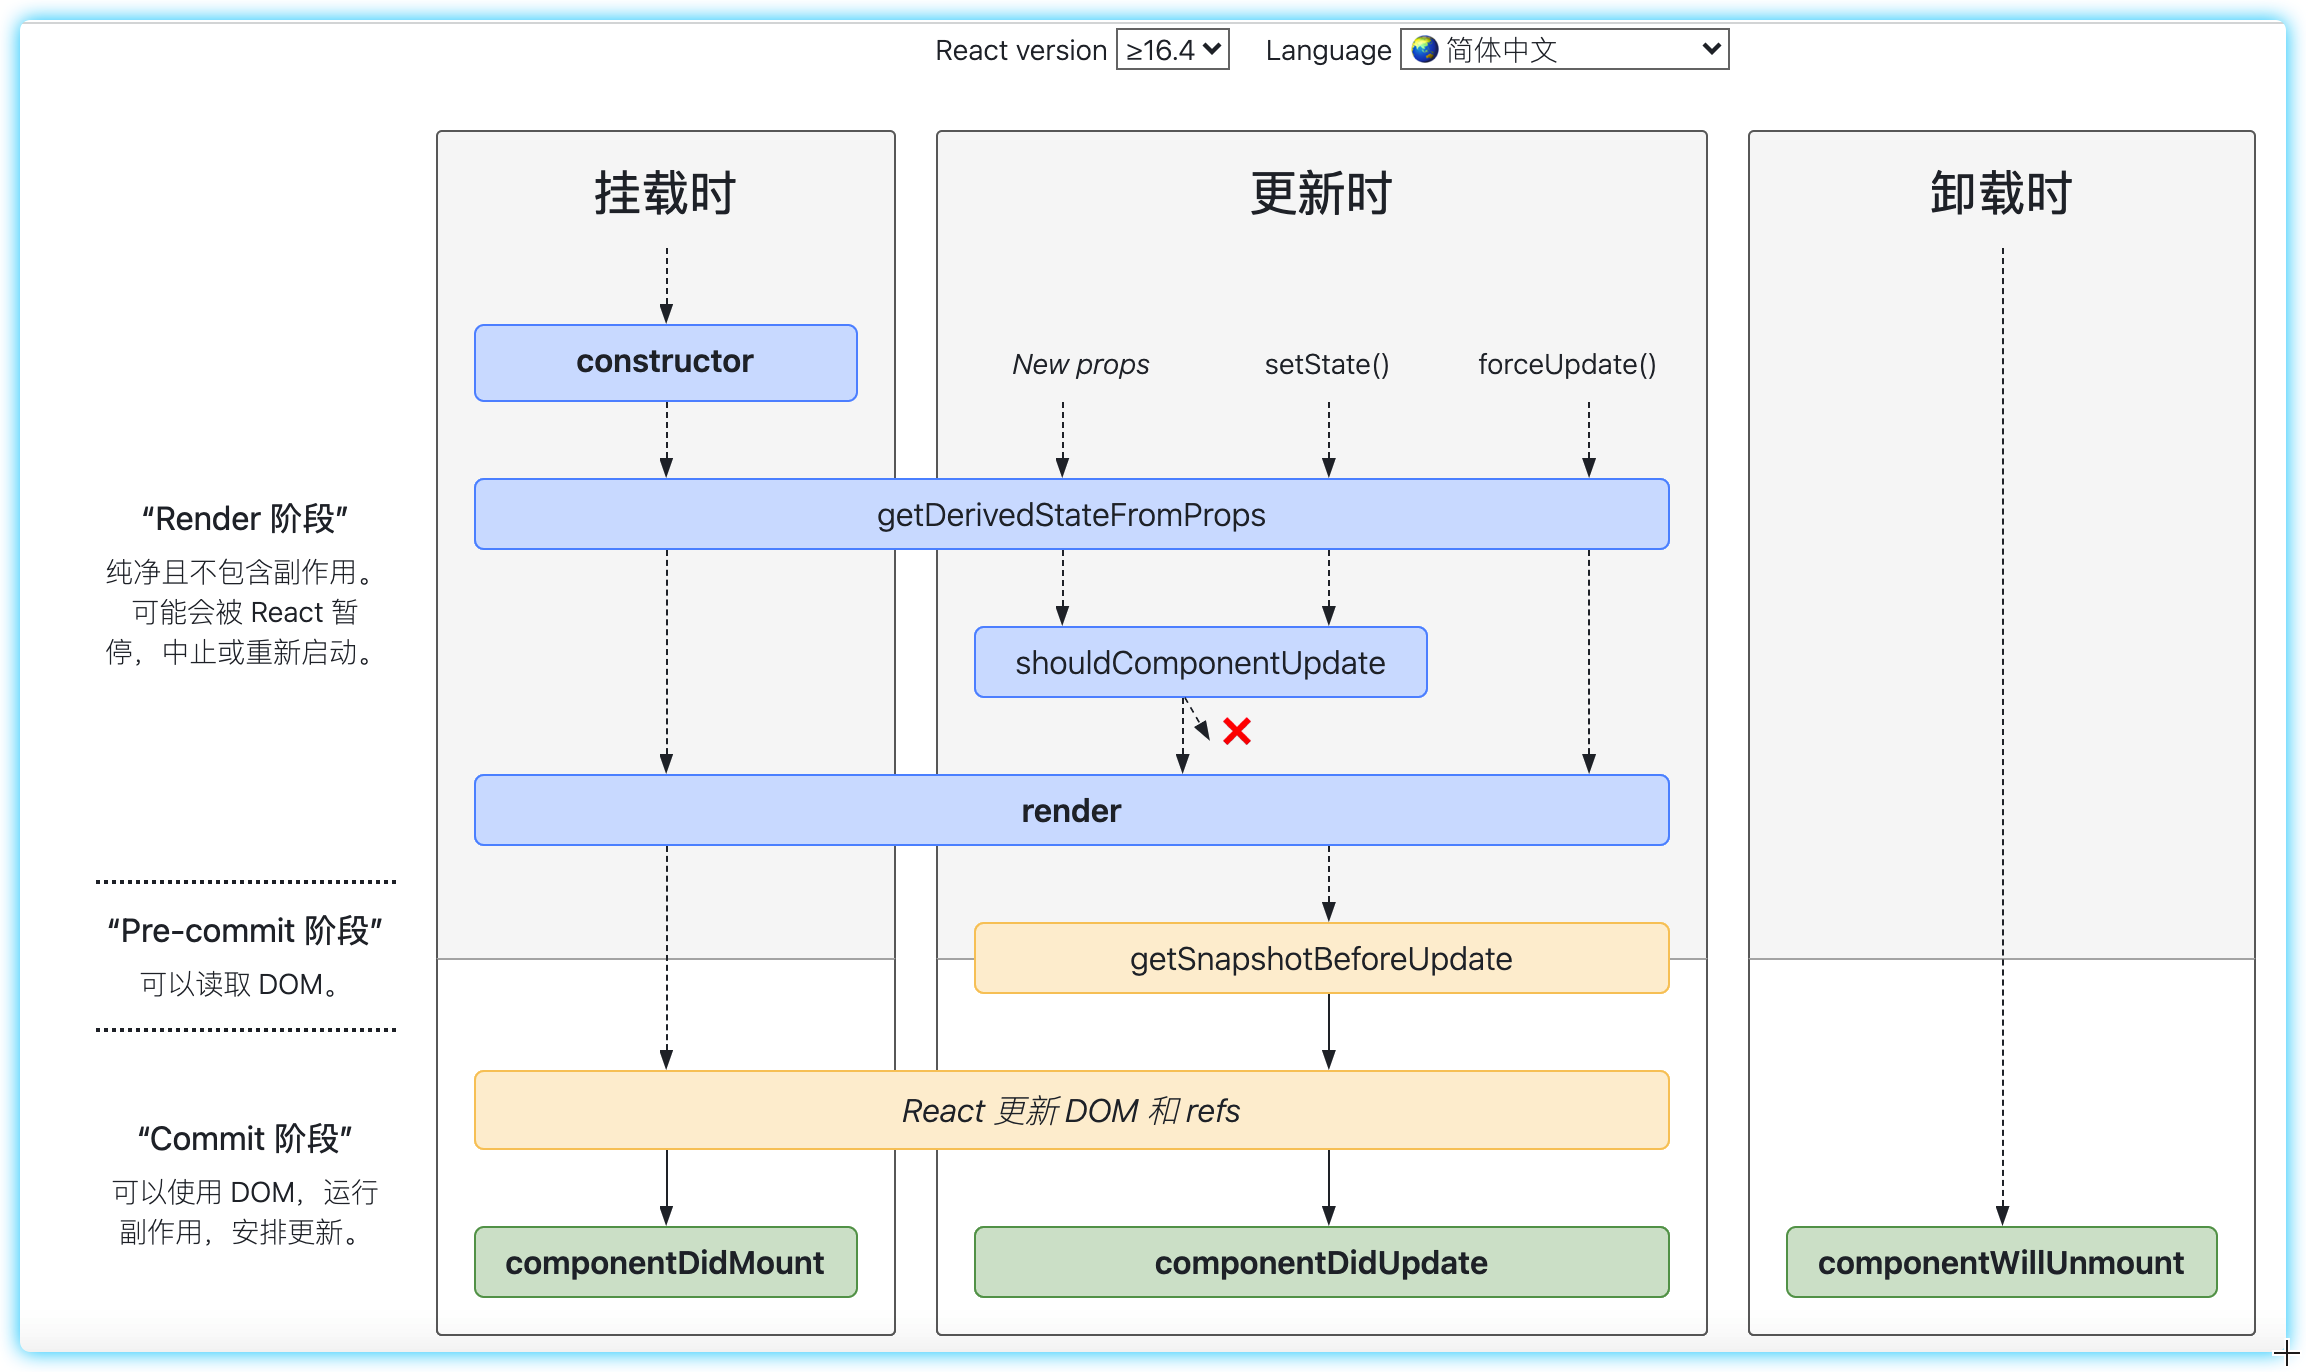
# 图解生命周期
# v16.4

图片资源来源于React官网:https://projects.wojtekmaj.pl/react-lifecycle-methods-diagram/
注:16.3 React 修复了getDerivedStateFromProps 在setState()不更新的Bug。
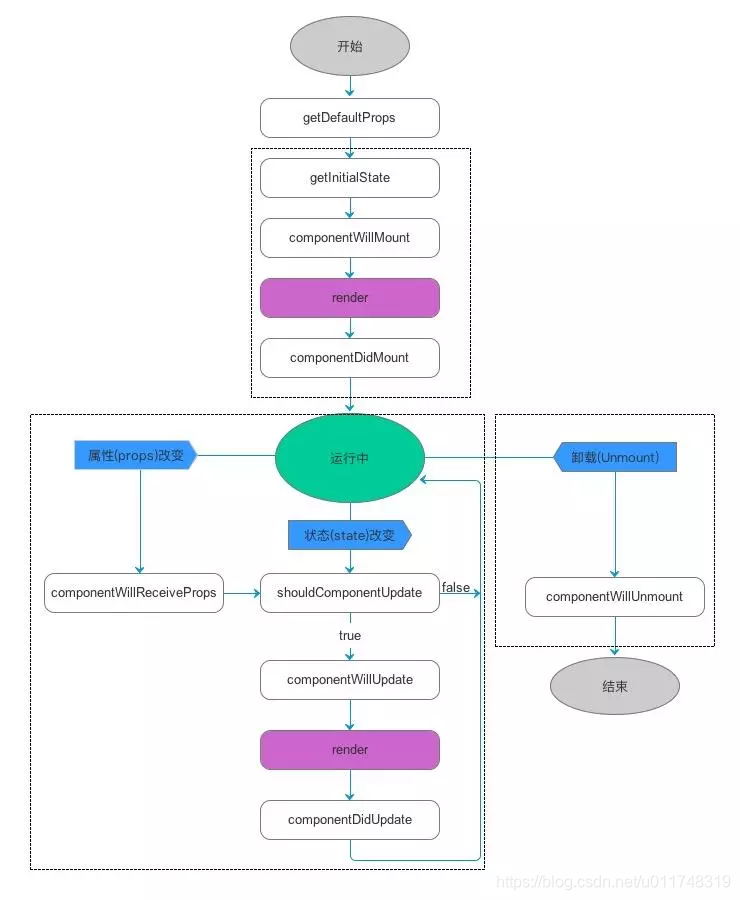
# v15

还有一张知乎程墨的图:主要就是props改变后多走了一步componentWillReceiveProps
