 redux 源码分析一:常用API介绍
# 0.前言
本篇博客主要的目的是快速介绍 redux 中的基本概念和API。
# 1.基本概念和API
# 1.1 store
Store 就是保存数据的地方,你可以把它看成一个容器。整个应用只能有一个 Store。
Redux 提供createStore这个函数,用来生成 Store对象。
import { createStore } from 'redux';
const store = createStore(fn);
2
store 提供了三个方法:
store.getState():获取当前时刻的state。store.dispatch():View发出Action的唯一方法。store.dispatch({ type: 'ADD_TODO', payload: 'Learn Redux' });1
2
3
4store.subscribe():设置监听函数,一旦state发生变化,就自动执行这个函数。常规的搭配:
let unsubscribe = store.subscribe(() =>
  console.log(store.getState())
);
unsubscribe();
1
2
3
4
# 1.2 Action 以及 Redux 的工作流程

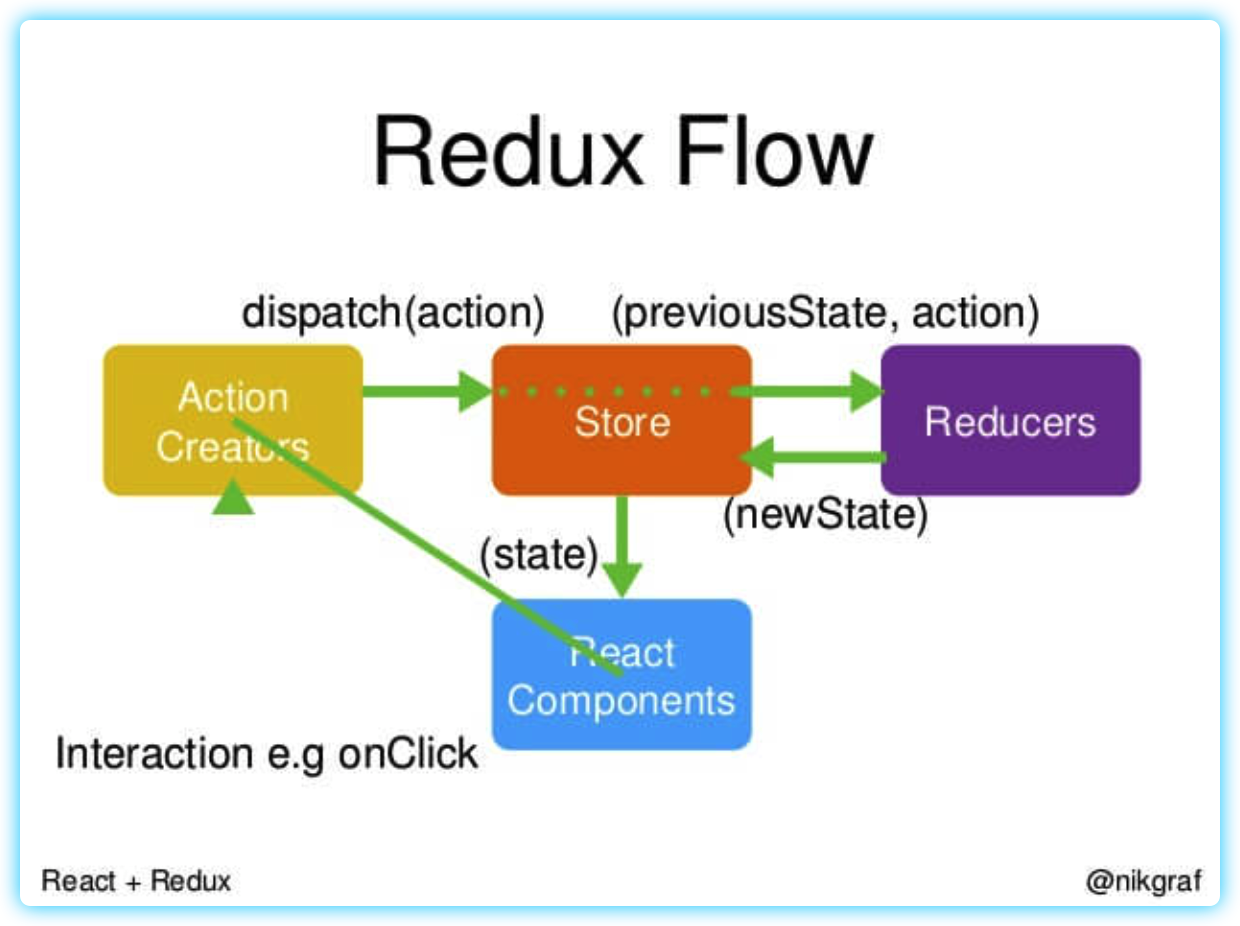
在 redux 中对状态的管理如上:
state存放在store中,View对应着React Components。View可以通过store.getState()获取到state。但是不允许直接修改store中的state,按照redux规范需要通过ActionCreators对store中的值进行操作。官方推荐修改
store中的state最佳实践,如下:ActionTypes:Magic stringconst ADD_TODO = '添加 TODO';1ActionCreatorsexport const addTodo = payload => { return { type: ADD_TODO, payload } }1
2
3
4
5
6生成一个
Actionconst action = addTodo('Learn Redux');1调用
store.dispatch(),此方法是View发出Action的唯一方法。store.dispatch(action);1
上述4个步骤看似复杂,实则等价下面这种写法。
store.dispatch({type: ADD_TODO,'Learn Redux'});1
# 1.3 Reducer文件
store 收到 Action 以后,还有一步,即需要告诉计算机ADD_TODO和操作的是state中的value变量,这样 对View的状态更新形成闭环。并且Redux规定接受的必须是一个newState,而计算 newState 的过程就叫做 Reducer。
ps. 从形式来说,看上去是
store内部对接受到action的一个响应,即对不同的actionType进行相应的state的修改,实则reducer的本质是createNewState函数,是dispatch的底层实现,这一点在分析源码时可以发现这一点。
Reducer.js 文件一般如下:
// 1. 包含存入 store 中的 initialState
const defaultState = 0;

// 2. 接受 state,action => newState (switch case语法)
export const reducer = (state = defaultState, action) => {
  switch (action.type) {
    case 'ADD':
      return state + action.payload;
    default:
      return state;
  }
};

/*
通过 reducer 函数可以生成一个新的state,以下函数非文件的一部分
const newstate = reducer(1, {ActionType:'ADD',payload:2});
*/
2
3
4
5
6
7
8
9
10
11
12
13
14
15
16
17
# 1.4 Redux项目:
以下,是一个非常简单的计数器redux项目:完整代码见github (opens new window)
// 1.reducer.js
const reducer = (state = 0, action) => {
  switch (action.type) {
    case 'INCREMENT': return state + 1; // 2.省略 ActionTypes文件
    case 'DECREMENT': return state - 1;
    default: return state;
  }
};

// 3.Components文件夹/Container文件夹
const Counter = ({ value, onIncrement, onDecrement }) => (
  <div>
  <h1>{value}</h1>
  <button onClick={onIncrement}>+</button>
  <button onClick={onDecrement}>-</button>
  </div>
);

// 4.App.js
const store = createStore(reducer);
const render = () => {
  ReactDOM.render(
    <Counter
      value={store.getState()}
      // 5.这里直接传递 {type: 'INCREMENT'} 而省略 ActionCreactor 文件
      onIncrement={() => store.dispatch({type: 'INCREMENT'})}
      onDecrement={() => store.dispatch({type: 'DECREMENT'})}
    />,
    document.getElementById('root')
  );
};

render();
store.subscribe(render);
2
3
4
5
6
7
8
9
10
11
12
13
14
15
16
17
18
19
20
21
22
23
24
25
26
27
28
29
30
31
32
33
34
官方推荐的最佳实践项目的拓扑结构 (opens new window),如下所示:
├── actions            # ActionCreators文件
│   └── index.js
├── api                # 公共api
│   ├── products.json
│   └── shop.js
├── components         # 组件文件(小组件)
│   ├── Cart.js
│   ├── Cart.spec.js
│   ├── Product.js
│   ├── Product.spec.js
│   ├── ProductItem.js
│   ├── ProductItem.spec.js
│   ├── ProductsList.js
│   └── ProductsList.spec.js
├── constants
│   └── ActionTypes.js # ActionTypes
├── containers         # 容器文件(大组件)
│   ├── App.js
│   ├── CartContainer.js
│   └── ProductsContainer.js
├── index.js 					 # 存放状态,即store
├── reducers           # reducer文件
│   ├── cart.js
│   ├── cart.spec.js
│   ├── index.js
│   ├── index.spec.js
│   ├── products.js
│   └── products.spec.js
└── setupTests.js
1
2
3
4
5
6
7
8
9
10
11
12
13
14
15
16
17
18
19
20
21
22
23
24
25
26
27
28
29
# 2.React-redux
为了方便使用,Redux的作者封装了一个 React 专用的库 React-Redux (opens new window)。
核心只有一个函数 connect,用于连接全局状态GlobalContext。
具体使用方法如下:
使用
Provider创建全局环境。import { Provider } from 'react-redux' render( <Provider store={store}> <App /> </Provider>, document.getElementById('root') )1
2
3
4
5
6
7
8使用
connect创建一个HOC组件,去连接这个Provider提供的全局环境。类似的函数:
withRouter高阶组件import { connect } from 'react-redux' const HOC_Component = connect( mapStateToProps, mapDispatchToProps )(Component)1
2
3
4
5
其中,mapStateToProps和mapDispatchToProps是两个selector,前者用于筛选props,后者用于筛选dispatch。
举例说明:
// 全局仓库有:
state = {
  count : 0
}

// 现有一个Action,用于修改 count
const increaseAction = {type: "increase"}

// 如果不传 `mapStateToProps` 和 `mapDispatchToProps`
// 可以直接从 props 中获取 state 和 dispatch
const HOC_Component = connect(null,null)({state,dispatch}=>{
  console.log(state.count) // 获取 count
  dispatch(increaseAction) // 修改 count
})
2
3
4
5
6
7
8
9
10
11
12
13
14
筛选后,对count的获取和修改则更为简单:
const mapStateToProps = (state) => value: state.count

const mapDispatchToProps = dispatc => {
  return {
    onIncreaseClick: () => dispatch(increaseAction)
  }
}

// 使用 selector 后,可直接获取到深层的状态(如state.b.c.d->d)以及修改`d`属性的方法。
const HOC_Component = connect(mapStateToProps,mapDispatchToProps)({count,onIncreaseClick}=>{
  console.log(count) // 获取 count
  onIncreaseClick()  // 修改 count
})
2
3
4
5
6
7
8
9
10
11
12
13
计数器的 react-redux 版本项目:这里 (opens new window)
# 3.总结
本篇博客一共学习到了两个仓库redux和react-redux。
在redux中我们需要了解:
store中存放着,视图层所需的state- 读:
store.getState() - 写:
store.dispatch(action) - 视图更新:
store.subscribe()
- 读:
- 了解
redux中的项目结构,官方推荐的最佳实践,需要额外创建ActionTypes、ActionCreators等文件,使用时需要手动构建大量的模板代码,这也是redux诟病的地方。
在react-redux中核心的知识点就是:connect的使用
connect是一个高阶的组件,可以快速于全局state绑定。- 两个
selector的函数的使用,目的除了起到筛选props和dispatch,简化使用的目的外,实际上还起到精确渲染的作用,通过后续的源码讲解可以对这一点更为清晰的认识。
# 4.参考
本篇博客主要参考了阮一峰的 redux 教程:
