
 React中使用onClick时的三种性能优化
# 前言
其实这里有点标题党了,实际上是希望解决的问题是,在组件中使用事件函数时可以执行的优化,而最常用的事件处理函数就是onClick函数。
先给上结论与实际使用方法,如果还有兴趣往下看的话,可以继续阅读。
本篇博客的主要结论有:
尽量不要在
render函数内定义事件函数高频操作的性能优化:
- 函数防抖(
debounce) - 函数节流(
throttling) - 增强版节流:
requestAnimationFrame
如果想要知道具体在项目中如何使用上面的优化方法,请跳转至:Talk is cheap,show me code
- 函数防抖(
# 一、bind
既然是对事件函数进行优化,第一步就是事件函数到底该如何定义?
比如,在传统的类组件中,我们是如何将函数绑定到组件实例上呢?
# 第一种方案:使用bind
class Foo extends Component {
  constructor(props) {
    super(props);
    this.handleClick = this.handleClick.bind(this);
  }
  handleClick() {
    console.log('Click happened');
  }
  render() {
    return <button onClick={this.handleClick}>Click Me</button>;
  }
}
2
3
4
5
6
7
8
9
10
11
12
以及 render 内写法
return <button onClick={this.handleClick.bind(this)}>Click Me</button>;
# 第二种方案:使用箭头函数(也是目前使用最多的)
class Foo extends Component {
  handleClick = () => {
    console.log('Click happened');
  }
  render() {
    return <button onClick={this.handleClick}>Click Me</button>;
  }
}
// 还有一种写法:感觉用的人不是很多,就是当有参数传入的箭头函数,之前以为是不能改写,其实也可以的。
class Foo extends Component {
  handleClick = ("参数")=>() => {
    console.log('Click happened');
  }
  render() {
    return <button onClick={this.handleClick("参数")}>Click Me</button>;
  }
}
2
3
4
5
6
7
8
9
10
11
12
13
14
15
16
17
18
以及 render 内写法
return <button onClick={()=>{}}>Click Me</button>;
在React官网 (opens new window)中,对此的评价是:
- 在render方法中使用
Function.prototype.bind会在每次组件渲染时创建一个新的函数,可能会影响性能(参见下文)- 在render方法中可以使用箭头函数,但会在每次组件渲染时创建一个新的函数,可能会影响性能(参见下文),如果遇到了性能问题,一定要进行优化!
点击查看
传统的函数定义与箭头函数的区别?
结论是:当不使用this指针时,两者基本没有没啥区别。注意这里是基本,像arguments对于箭头函数当然是没有的啦。
在日常开发中,两者的区别在于:主要是this指针的执行不同,箭头函数能正常访问到外部的上下文(外部变量)。
会发生this差异的场景:
- 最常见的是点击事件中的
this,一般指向函数的调用者,此时this指向button按钮。 - 还有情况是,定义的事件函数要传递给其他组件使用。
⭐️在React中经常遇到一个问题:父组件 子组件
无论子组件的接受父组件的props中的值是否改变,都会触发子组件的渲染。
当然,一般情况下,不去处理也没啥太大的问题,因为这种渲染不会带来太大的性能问题。
render函数的执行 Dom render。
当然,实在看不爽,我们可以也使用PureComponent或者ShouldComponentDidUpata去优化。
但是对于这种性能优化,我的编程方式经历了三个阶段:
# 二、思考:是否使用shouldComponentDidUpdate的三个阶段
使用shouldComponentDidUpdate 不用 使用
使用
shouldComponentDidUpdate刚学的时候,什么都不会,才发现父组件改变了,子组件的
render函数每次都会重新执行一遍。于是我做了下面的这个蠢事:使用
JSON.stringify()去校验子组件的props是否改变。props中一定会存在复杂数据类型,简单的浅比较还是渲染子组件。但是这种深比较太费性能了,远比重复渲染带来更到的性能问题。
不用
shouldComponentDidUpdate所以第二阶段我干脆不用了
shouldComponentDidUpdate,因为什么都不做要比瞎优化好的多,或者只是单纯控制props中的几个关键变量的变化。再次使用
shouldComponentDidUpdate前者说了
render函数的执行Dom render。但是,如果我们的render中有一个超大变量的定义时,或者在render函数中存在非常昂贵的性能操作了。此时可能
gpu不爆炸了,可能cpu要爆炸了。(这种说法肯定是错的,但是记忆还是不错的)
# 结论:
需要非常清楚,影响性能消耗的原因。尽量不要在render中做太多的事情。
比如:可以在函数中定义的就在函数中定义,有些请求能在constructor或者其他生命周期中完成的,就完全没必要放在render函数中。
# 三、三种高频操作的性能优化方案
# debounce(防抖)与throttle(节流)
这一块主要是针对高频操作的事件函数,如onScoll、或者高频的onClick操作的优化。
这里不使用中文防抖与节流来作为标题,主要是原先的两个名称实在是太难记忆了。
现在给出官方定义:
节流 (Throttle):节流是阻止函数在给定时间内被多次调用,以时间频率更新状态。——解决调用太快。
防抖 (debounce):抖确保函数上次执行后的一段时间内,不会再次执行。——解决调用太多次。
还是看图比较直观:
throttle和debounce的可视化页面 (opens new window)。
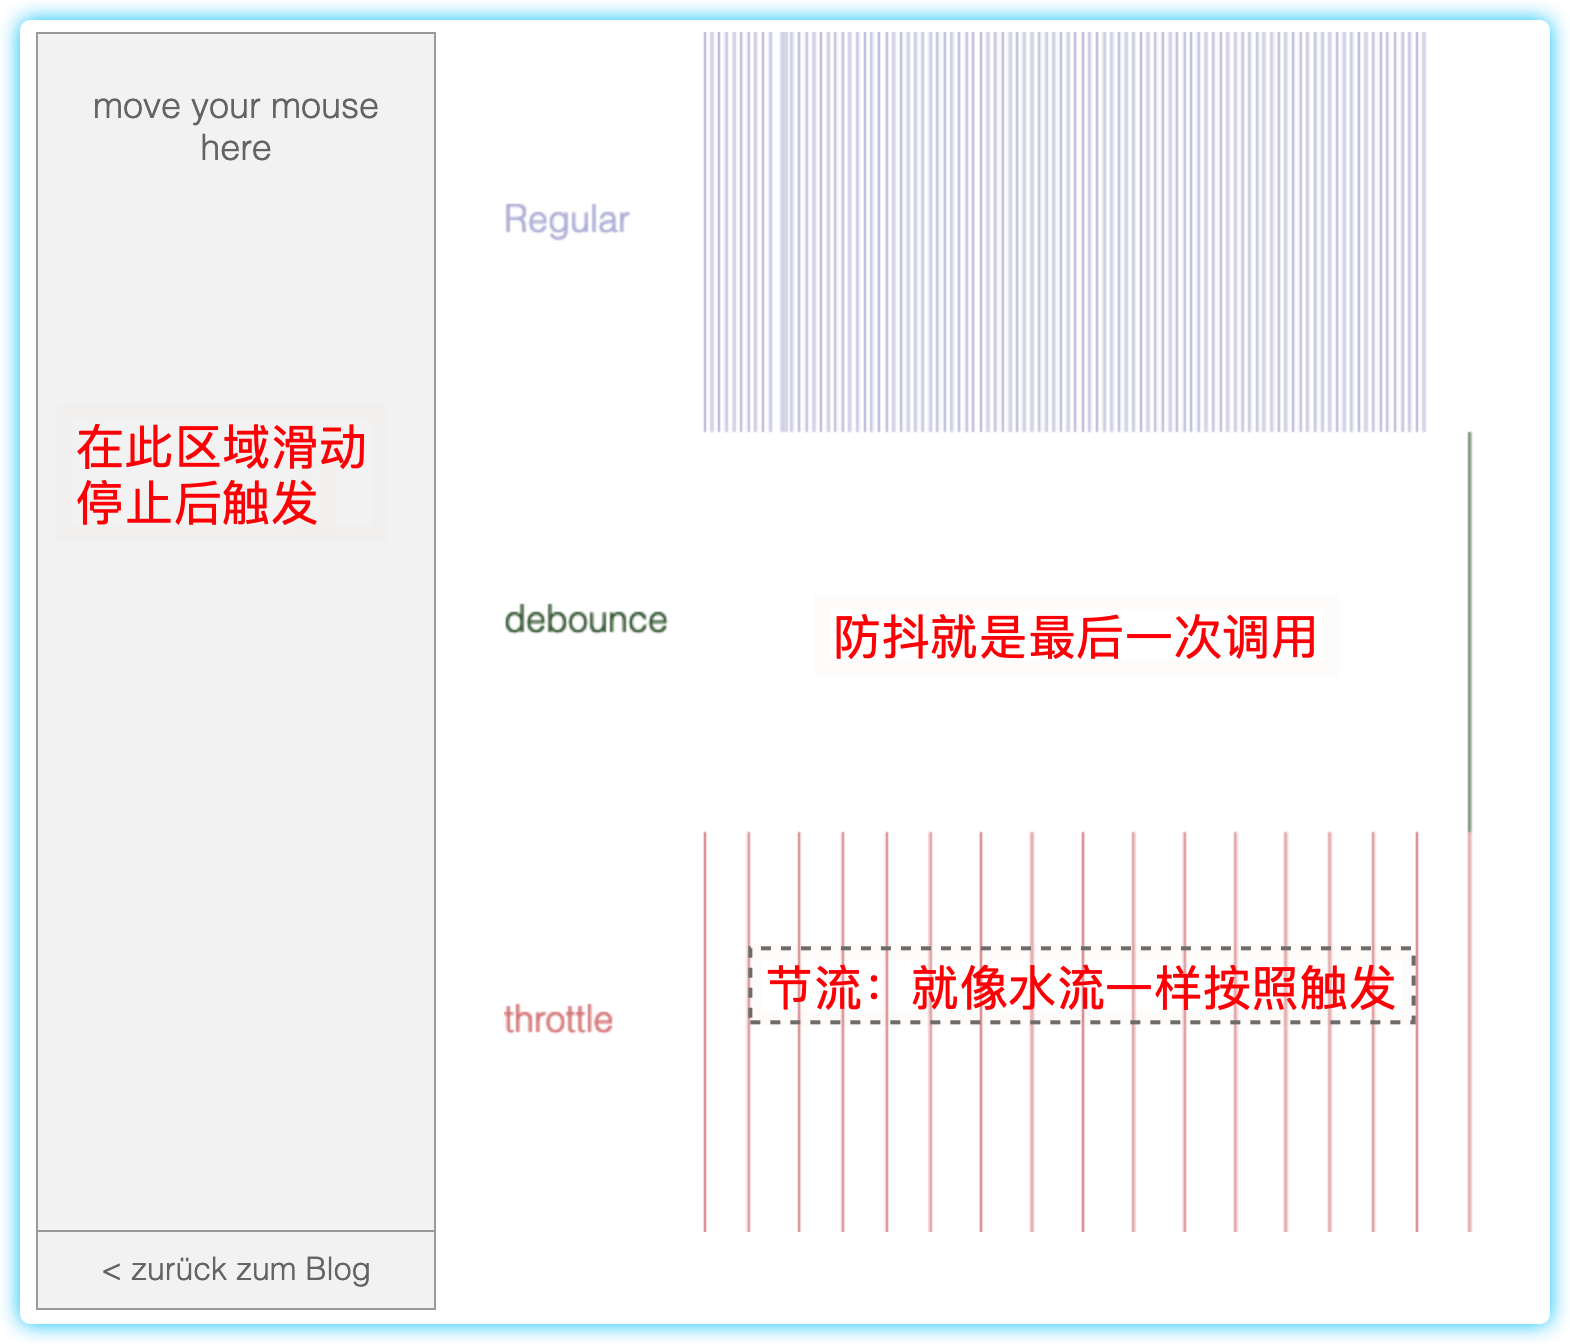
根据上面这张图就很轻松判断当前事件函数使用哪儿个方案解决,比方说:
- 频繁点击:希望只保留最后一次,但就用
debounce - 滚动触发:只希望滚动按照一定节奏更新视图:就用
throttle
# requestAnimationFrame节流
这种方案是节流的扩展,在节流中我们肯定是用setInterval去实现的,那一般间隔的秒数肯定是有我们决定的,对于像滚动这类操作,我们只需要保证人眼视力捕获动态的物体的最小帧数,即每秒24帧。一般写代码的时候,我们尽力确保每秒60帧。
但是这里存在一个问题,如果有些设备的最高帧数只有30帧怎么办呢?那60帧与30帧则没有任何区别。
React官网对此的解释:
使用
requestAnimationFrame来节流是一种有用的技术,它可以防止在一秒中进行60帧以上的更新。如果要求一秒钟内完成100次更新,则会为浏览器创建额外的负担,而用户无法看到这些工作(不能区别每秒100帧和60帧的区别)。
# 实操:Talk is cheap,show me code
以上三个方法,都已经有第三库集成实现了。
- throttling: 基于时间的频率来进行更改 (例如
_.throttle(opens new window)) - debouncing: 一段时间的不活动之后进行更改 (例如
_.debounce(opens new window)) requestAnimationFrame:基于requestAnimationFrame(opens new window)来进行更改 (例如raf-schd(opens new window))
# 1. debouce(防抖)
import _ from 'lodash';

class Searchbox extends React.Component {
  constructor(props) {
    super(props);
    // bind 绑定好评!
    this.handleChange = this.handleChange.bind(this);
    this.emitChangeDebounced = _.debounce(this.emitChange, 250);
  }

  componentWillUnmount() {
    this.emitChangeDebounced.cancel();
  }

  render() {
    // 控制输入的更新速度
    return <input onChange={this.handleChange}>;
  }

  handleChange(e) {
    // 原先的话,直接写:this.emitChange(e.target.value)

    // 使用lodash的话,直接包一层就可以了。
    this.emitChangeDebounced(e.target.value);
  }

  emitChange(value) {
    // 实际触发函数
    this.props.onChange(value);
  }
}
2
3
4
5
6
7
8
9
10
11
12
13
14
15
16
17
18
19
20
21
22
23
24
25
26
27
28
29
30
31
# 2. throttle(节流)
import throttle from 'lodash.throttle';

class LoadMoreButton extends React.Component {
  constructor(props) {
    super(props);
    this.handleClick = this.handleClick.bind(this);
    this.handleClickThrottled = throttle(this.handleClick, 1000);
  }

  componentWillUnmount() {
    this.handleClickThrottled.cancel();
  }

  render() {
    return <button onClick={this.handleClickThrottled}>Load More</button>;
  }

  handleClick() {
    this.props.loadMore();
  }
}
2
3
4
5
6
7
8
9
10
11
12
13
14
15
16
17
18
19
20
21
# 3. requestAnimationFrame节流
官网给出的:控制scroll的方法,使用方法同节流。
只是多了一步,需要解除监听,将rafSchedule返回值保留下来,用于取消监听。
import rafSchedule from 'raf-schd';

class ScrollListener extends React.Component {
  constructor(props) {
    super(props);

    this.handleScroll = this.handleScroll.bind(this);
    this.scheduleUpdate = rafSchedule(
      point => this.props.onScroll(point)
    );
  }

  handleScroll(e) {
    this.scheduleUpdate({ x: e.clientX, y: e.clientY });
  }

  componentWillUnmount() {
    this.scheduleUpdate.cancel();
  }

  render() {
    return (
      <div
        style={{ overflow: 'scroll' }}
        onScroll={this.handleScroll}
      >
        <img src="/my-huge-image.jpg" />
      </div>
    );
  }
}
2
3
4
5
6
7
8
9
10
11
12
13
14
15
16
17
18
19
20
21
22
23
24
25
26
27
28
29
30
31
点击查看
但是上面的代码没办法直接运行,这里给出的代码可以直接执行
<!DOCTYPE html>
<html lang="en">
  <head>
    <title>Document</title>
    <style>
      #e {
        width: 100px;
        height: 100px;
        background: brown;
        position: absolute;
        left: 0;
        top: 0;
        zoom: 1;
      }
    </style>
  </head>
  <body>
    <div id="e"></div>
    <script>
      var e = document.getElementById("e");
      var flag = true;
      var left = 0;

      function render() {
        if (flag == true) {
          if (left >= 100) {
            flag = false;
          }
          e.style.left = ` ${left++}px`;
        } else {
          if (left <= 0) {
            flag = true;
          }
          e.style.left = ` ${left--}px`;
        }
      }
      //requestAnimationFrame效果
      (function animloop(time) {
        console.log(time, Date.now());
        render();
        rafId = requestAnimationFrame(animloop);
        //如果left等于50 停止动画
        if (left == 50) {
          cancelAnimationFrame(rafId);
        }
      })();
    </script>
  </body>
</html>
2
3
4
5
6
7
8
9
10
11
12
13
14
15
16
17
18
19
20
21
22
23
24
25
26
27
28
29
30
31
32
33
34
35
36
37
38
39
40
41
42
43
44
45
46
47
48
49
50
# 本篇blog未解决的问题
手写
节流与防抖,此部分会单独另开一个blog文章记录。在
requestAnimationFrame函数的可控操作中,与目前接受的项目中的一个函数非常像,当时一直没有看懂,看了第二篇参考博客才知道这是为了解决:同步服务端时间与本地时间不一致的问题。比如:服务端时间:A、客户端时间B1和B2。
前端去请求数据的时候,服务端会返回:A-B1,请求成功的客户端时间为B2。
只需要将时间差相加则有:
则本地请求结束后,就拿到服务端目前的真实时间了。